k8s HA architecture 구축
k8s HA Architecture
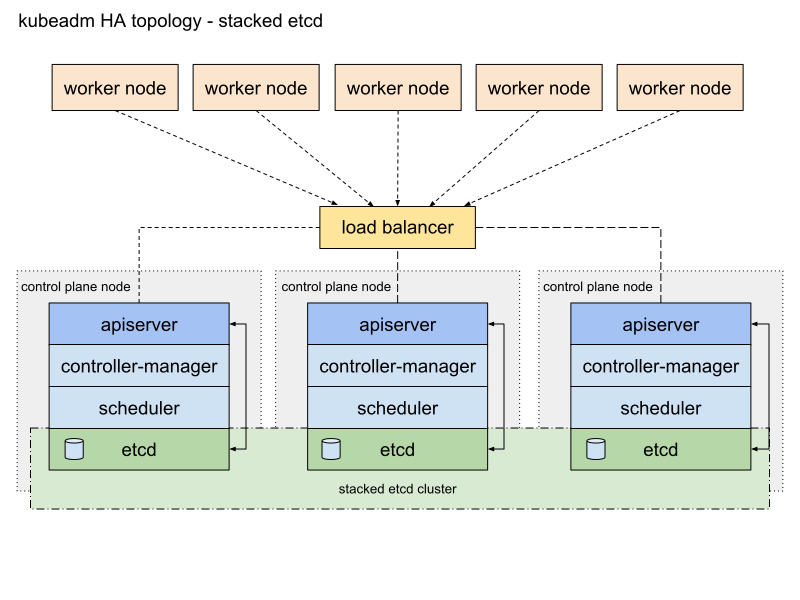
이제 HA를 고려한 k8s architecture를 알아봅시다.
HA를 위해 control plane node와 worker node를 다중화하고 Load Balancer를 통해 control plane과 worker 간 통신을 진행합니다.
보통 etcd의 위치에 따라 architecture 구조가 달라집니다.
etcd가 각 control plane node 안에 존재한다면 stacked etcd topology이며 etcd cluster가 외부에 존재한다면 external etcd topology입니다.

HA를 고려한 k8s cluster 구축
저는 VM을 사용하여 다음과 같은 아키텍처를 구축해보려고 합니다.

- control plane node 3개
- worker node 3개
- stacked etcd topology
worker node, load balancer, control plane node는 모두 VM을 통해 격리할 예정입니다.
이전 포스팅에서 on premise 환경에서 k8s cluster를 구축해보았습니다.
https://growth-coder.tistory.com/368
VM으로 On-Premise 환경에서 k8s cluster 구축하기
개요On-Premise 환경에서 k8s cluster를 구축해보려고 합니다. container 기술 개념 정리k8s에 대해 이해하기 위해 먼저 container 기술에 대한 개념 정리를 하려고 합니다. container 기술이란?container 기술이란
growth-coder.tistory.com
해당 포스팅에서 control plane node, worker node 공통 세팅이 된 VM을 복제하여 총 7개의 복제본을 만들었습니다.
세팅했던 k8s는 초기화를 했고 다시 k8s cluster를 구축하기 전에 먼저 load balancer를 만들겠습니다.
kubeadm init을 할 때 load balancer 주소를 알려줘야 하기 때문에 load balancer부터 생성합니다.
Load Balancer 설치
worker node들이 control plane으로 요청을 보낼 때 여러 개의 control plane node로 부하를 분산해 줄 load balancer가 필요합니다.
load balancer로는 HA proxy를 사용하기로 결정했습니다.
VM을 하나 띄우고 haproxy를 설치합니다.
apt install haproxy
/etc/haproxy/haproxy.cfg 파일을 열어보면 아래와 같은 설정 파일이 존재합니다.
global
        log /dev/log    local0
        log /dev/log    local1 notice
        chroot /var/lib/haproxy
        stats socket /run/haproxy/admin.sock mode 660 level admin
        stats timeout 30s
        user haproxy
        group haproxy
        daemon

        # Default SSL material locations
        ca-base /etc/ssl/certs
        crt-base /etc/ssl/private

        # See: https://ssl-config.mozilla.org/#server=haproxy&server-version=2.0.3&config=intermediate
        ssl-default-bind-ciphers ECDHE-ECDSA-AES128-GCM-SHA256:ECDHE-RSA-AES128-GCM-SHA256:ECDHE-ECDSA-AES256-GCM-SHA384:ECDHE-RSA-AES256-GCM-SHA384:ECDHE-ECDSA-CHACHA20-POLY1305:ECDHE-RSA-CHACHA20-POLY1305:DHE-RSA-AES128-GCM-SHA256:DHE-RSA-AES256-GCM-SHA384
        ssl-default-bind-ciphersuites TLS_AES_128_GCM_SHA256:TLS_AES_256_GCM_SHA384:TLS_CHACHA20_POLY1305_SHA256
        ssl-default-bind-options ssl-min-ver TLSv1.2 no-tls-tickets

defaults
        log     global
        mode    http
        option  httplog
        option  dontlognull
        timeout connect 5000
        timeout client  50000
        timeout server  50000
        errorfile 400 /etc/haproxy/errors/400.http
        errorfile 403 /etc/haproxy/errors/403.http
        errorfile 408 /etc/haproxy/errors/408.http
        errorfile 500 /etc/haproxy/errors/500.http
        errorfile 502 /etc/haproxy/errors/502.http
        errorfile 503 /etc/haproxy/errors/503.http
        errorfile 504 /etc/haproxy/errors/504.http
여기에서 간단하게 6443 포트로 들어온 요청을 master node에게 넘겨주는 코드를 작성해봅시다.
저는 현재 master node의 ip 주소가 192.168.35.243입니다.
frontend apiserver
    bind *:6443
    mode tcp
    option tcplog
    default_backend apiserverbackend

backend apiserverbackend
    option httpchk

    http-check connect ssl
    http-check send meth GET uri /healthz
    http-check expect status 200

    mode tcp
    balance     roundrobin
    server master1 192.168.35.243:6443 check verify none
이 코드를 추가하고 haproxy 설정을 적용하기 위해 재시작합니다.
systemctl restart haproxy
간단하게 haproxy 설정에 대해 알아봅시다.
1. mode tcp
mode tcp에서 확인할 수 있듯이 HA proxy를 L4 로드 밸런서로 사용하고 있습니다.
그리고 k8s는 보안을 위해 기본적으로 TLS를 사용하여 데이터 암호화를 제공합니다.
k8s API server가 가지고 있는 인증서와 CA(private CA 혹은 recognized CA)를 통해 클라이언트는 API 서버와 https 통신을 할 수 있게 됩니다.
이 때, L4 load balancer를 사용하면 이미 암호화된 데이터가 L4 load balancer에 도착했을 때 복호화를 수행하지 않고 바로 API 서버에게 전달할 수 있습니다.
2. http-check
http-check는 헬스체크에 관련된 내용이고 다음과 같은 설정이 있습니다.
- connect ssl: https 통신으로 헬스 체크를 수행합니다.
- send meth GET uri /healthz: /healthz 경로로 GET 요청을 보내서 헬스 체크를 수행합니다.
- expect status 200: 200 상태 코드가 반환되면 성공입니다.
k8s cluster 구축
제가 생성한 load balancer의 ip는 192.168.35.146이고 port는 위에서 설정한 것처럼 6443 포트입니다.
kubeadm init을 하는데 --control-plane-endpoint에 <load balancer ip 주소 : load balancer port>를 입력하면 됩니다.
kubeadm init --control-plane-endpoint 192.168.35.146:6443 \
--pod-network-cidr=10.0.0.0/16 \
--cri-socket unix:///run/containerd/containerd.sock \
--upload-certs
--upload-certs 옵션을 사용하면 인증서를 업로드하고 이 인증서는 모든 control plane node들이 공유합니다.
성공하면 다음과 같은 내용이 출력됩니다.
Your Kubernetes control-plane has initialized successfully!

To start using your cluster, you need to run the following as a regular user:

  mkdir -p $HOME/.kube
  sudo cp -i /etc/kubernetes/admin.conf $HOME/.kube/config
  sudo chown $(id -u):$(id -g) $HOME/.kube/config

Alternatively, if you are the root user, you can run:

  export KUBECONFIG=/etc/kubernetes/admin.conf

You should now deploy a pod network to the cluster.
Run "kubectl apply -f [podnetwork].yaml" with one of the options listed at:
  https://kubernetes.io/docs/concepts/cluster-administration/addons/

You can now join any number of control-plane nodes running the following command on each as root:

  kubeadm join 192.168.35.146:6443 --token dgvyqy.wgmjmsx2wypdmihh \
        --discovery-token-ca-cert-hash sha256:ebcdb33e11c601519c20b9c85e36cb1749c663bd675cbbafd06092ceab0dfbeb \
        --control-plane --certificate-key 4fe72208927093785476db6b0278342b1a625f333bb03f09a69f24d2c832fa54

Please note that the certificate-key gives access to cluster sensitive data, keep it secret!
As a safeguard, uploaded-certs will be deleted in two hours; If necessary, you can use
"kubeadm init phase upload-certs --upload-certs" to reload certs afterward.

Then you can join any number of worker nodes by running the following on each as root:

kubeadm join 192.168.35.146:6443 --token dgvyqy.wgmjmsx2wypdmihh \
        --discovery-token-ca-cert-hash sha256:ebcdb33e11c601519c20b9c85e36cb1749c663bd675cbbafd06092ceab0dfbeb
마찬가지로 출력문에 나온 세 명령어를 입력합니다.
  mkdir -p $HOME/.kube
  sudo cp -i /etc/kubernetes/admin.conf $HOME/.kube/config
  sudo chown $(id -u):$(id -g) $HOME/.kube/config
이제 명령어를 보고 control plane node와 worker node를 추가하면 됩니다.