데이터를 바탕으로 화면을 그려주어야 할 때 크게 클라이언트 사이드 렌더링 방식(CSR)과 서버 사이드 렌더링 방식(SSR)으로 나뉜다.
CSR은 서버에서 보내준 데이터를 가지고 클라이언트에서 화면을 그리는 방식이고 SSR은 서버가 직접 데이터를 가지고 화면을 만들어서 클라이언트에게 전달해주는 방식이다.
SSR 방식을 사용할 경우 서버 사이드 템플릿 엔진을 사용해야한다.
종류로는 Thymeleaf, Mustache, JSP 등등이 있지만 요즘 주로 사용하는 템플릿 엔진은 Thymeleaf이다.
Thymeleaf의 기초 문법에 대해 공부해보려 한다.
프로젝트 처음 생성할 때
https://start.spring.io/ 사이트에서 dependency를 추가할 때는 아래처럼 직접 Thymeleaf를 추가하면 된다.

이미 생성된 프로젝트
이미 생성된 프로젝트에서 Thymeleaf를 추가하려면 build.gradle의 dependencies에서 다음 코드를 추가한 다음 코끼리를 눌러준다.
dependencies {
.
.
.
   implementation 'org.springframework.boot:spring-boot-starter-thymeleaf'
}
기초 사용법
어떠한 url로 GET 요청이 들어오면 정보를 가공한 후 해당 정보를 보여주기 위해 컨트롤러를 만들어준다.
@Controller
public class ViewController {
    @GetMapping("/views/home")
    public String homeController(Model model) {
        model.addAttribute("name", "chulsoo");
        return "thymeleaf";
    }
}
컨트롤러의 파라미터로는 Model이 있다.
이 Model에 key, value 쌍으로 값을 저장하면 html 파일에서는 타임리프 문법을 사용하여 그 값을 가져올 수 있다.
name이라는 key에 chulsoo라는 value를 저장하고 있고 html에서는 이 값을 사용할 수 있다.
그리고 "thymeleaf"라는 String을 반환하고 있는데 이는 main/resources/templates에서 해당 이름을 가진 html 파일을 찾아서 반환해준다.
만약 practice.html이라는 파일이 templates 하위 디렉토리 practice 안에 있다면 return "practice/practice"라고 경로를 명시해줘야 한다.
즉 /views/home url로 접속을 하면 thymeleaf.html 파일을 보여주는 것이다.
그래서 main/resources/templates 안에 thymeleaf.html 파일을 생성해준다.

th : text
<thymeleaf.html>
<!DOCTYPE html>
<html lang="en" xmlns:th="http://www.w3.org/1999/xhtml">
<head>
    <meta charset="UTF-8">
    <title>Title</title>
</head>
<body>
    이름 : <span th:text="${name}"></span>
</body>
</html>
위처럼 th:Text를 사용하면 key에 해당하는 value를 가져올 수 있다.
http://localhost:8080/views/home
위 주소로 접속을 하면 이름을 보여준다.

객체를 전달할 수도 있다.
<Person>
@Getter
@Setter
public class Person {
    private String name;
    private int age;
}
<controller>
@GetMapping("/views/object")
public String objectController(Model model) {
    Person person = new Person();
    person.setAge(20);
    person.setName("chulsoo");
    model.addAttribute("object", person);
    return "thymeleafObject";
}
<html>
<!DOCTYPE html>
<html lang="en" xmlns:th="http://www.w3.org/1999/xhtml">
<head>
    <meta charset="UTF-8">
    <title>Title</title>
</head>
<body>
  나이 : <span th:text="${object.age}"></span>
  이름 : <span th:text="${object.name}"></span>
</body>
</html>

th : each
Person 객체의 리스트를 Model에 넣어보자.
<controller>
@GetMapping("/views/each")
public String eachController(Model model) {
    List<Person> people = new ArrayList<>();
    Person person1 = new Person();
    person1.setAge(20);
    person1.setName("chulsoo");

    Person person2 = new Person();
    person2.setAge(30);
    person2.setName("minsoo");

    Person person3 = new Person();
    person3.setAge(40);
    person3.setName("jeongsoo");

    people.add(person1);
    people.add(person2);
    people.add(person3);

    model.addAttribute("people", people);
    return "thymeleafEach";
}
<thymeleadEach.html>
<!DOCTYPE html>
<html lang="en" xmlns:th="http://www.w3.org/1999/xhtml">
<head>
    <meta charset="UTF-8">
    <title>Title</title>
</head>
<body>
  <table>
    <thead>
    <tr>
      <td>나이</td>
      <td>이름</td>
    </tr>
    </thead>
    <tbody>
    <tr th:each="person, i: ${people}">
      <td th:text="${person.age}"></td>
      <td th:text="${person.name}"></td>
    </tr>
    </tbody>
  </table>
</body>
</html>
people에서 하나씩 꺼내와 person에 넣어준다.

th:if th:unless
if, else 구문을 나타낼 수 있다.
<!DOCTYPE html>
<html lang="en" xmlns:th="http://www.w3.org/1999/xhtml">
<head>
    <meta charset="UTF-8">
    <title>Title</title>
</head>
<body>
  <table>
    <thead>
    <tr>
      <td>나이</td>
      <td>이름</td>
      <td>나이가 많습니까?</td>
    </tr>
    </thead>
    <tbody>
    <tr th:each="person, i: ${people}">
      <td th:text="${person.age}"></td>
      <td th:text="${person.name}"></td>
      <td th:if="${person.age>30}">네</td>
      <td th:unless="${person.age>30}" >아니오</td>
    </tr>
    </tbody>
  </table>
</body>
</html>
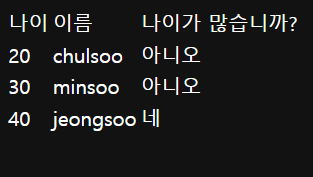
person.age가 30보다 크면 네, 작으면 아니오를 출력한다.

th:switch th:case
타임리프에서도 switch, case 문법이 존재한다.
일단 Person 클래스에 grade를 추가한다.
@Getter
@Setter
public class Person {
    private String name;
    private int age;
    private String grade;

}
<controller>
@GetMapping("/views/switch")
public String switchController(Model model) {
    List<Person> people = new ArrayList<>();
    Person person1 = new Person();
    person1.setAge(20);
    person1.setName("chulsoo");
    person1.setGrade("A");

    Person person2 = new Person();
    person2.setAge(30);
    person2.setName("minsoo");
    person2.setGrade("B");

    Person person3 = new Person();
    person3.setAge(40);
    person3.setName("jeongsoo");
    person3.setGrade("C");

    people.add(person1);
    people.add(person2);
    people.add(person3);

    model.addAttribute("people", people);
    return "thymeleafSwitch";
}
<thymeleafSwitch.html>
<!DOCTYPE html>
<html lang="en" xmlns:th="http://www.w3.org/1999/xhtml">
<head>
    <meta charset="UTF-8">
    <title>Title</title>
</head>
<body>
  <table>
    <thead>
    <tr>
      <td>나이</td>
      <td>이름</td>
      <td>성적 평가</td>
    </tr>
    </thead>
    <tbody>
    <tr th:each="person, i: ${people}">
      <td th:text="${person.age}"></td>
      <td th:text="${person.name}"></td>
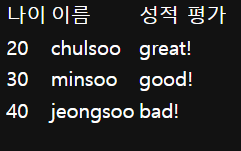
      <td th:switch="${person.grade}">
        <span th:case="A">great!</span>
        <span th:case="B">good!</span>
        <span th:case="C">bad!</span>
      </td>
    </tr>
    </tbody>
  </table>
</body>
</html>
th:href
해당 url로 이동할 수 있다.
<controller>
@GetMapping("/views/href")
public String hrefController(Model model) {
    return "thymeleafHref";
}
<thymeleafHref.html>
<!DOCTYPE html>
<html lang="en" xmlns:th="http://www.w3.org/1999/xhtml">
<head>
    <meta charset="UTF-8">
    <title>Title</title>
</head>
<body>
<a th:href="@{https://daum.net}">다음</a>
</body>
</html>
'공부 > Spring' 카테고리의 다른 글
| [Spring] 스프링 mysql 데이터베이스와 jpa 연동 (2) | 2023.02.17 |
|---|---|
| [Spring][Thymeleaf] 공통 레이아웃 적용 (Thymeleaf Layout Dialect) (1) | 2023.02.14 |
| [Spring][JPA] H2 데이터베이스를 사용한 JPA 기초 사용법 (0) | 2023.02.10 |
| [Spring][스프링 MVC 1편] 서블릿 기초 사용법 (0) | 2023.02.08 |
| [Spring] JSON과 같이 이미지 요청 받아서 저장 (0) | 2023.02.06 |