https://growth-coder.tistory.com/187
이전 포스팅에서 카카오에서 어떻게 카카오 로그인 기능을 제공해주는지 알아보았다.
이번 시간에는 스프링을 사용해서 간편하게 카카오 로그인을 진행해보려고 한다.
이전에 스프링 OAuth2로 네이버 로그인을 구현해보았는데 이 때 사용한 프로젝트에 카카오 로그인을 추가해 볼 예정이다.
https://growth-coder.tistory.com/142
[Spring] 스프링 OAuth2 네이버 로그인 (OAuth2 스프링 4편)
https://growth-coder.tistory.com/141 [Spring] 스프링 OAuth2 페이스북 로그인 (OAuth2 스프링 3편) 이전 구글 로그인에 이어서 페이스북 로그인도 진행해보려 한다. https://growth-coder.tistory.com/136 [Spring][Spring] 스
growth-coder.tistory.com
우선 kakao developers에서 이전에 생성한 애플리케이션에 들어간다.
1. WEB 플랫폼 등록
플랫폼을 등록해준다. 나는 로컬에서 테스트 할 예정이기 때문에 localhost 주소를 입력해 주었다.


2. Redirect URI 등록
이전 포스팅에서는 내가 Redirect URI를 정했지만 스프링의 OAuth2 기능을 사용하려면 형식에 맞게 Redirect URI를 정해줘야 한다.

3. Secret Code 생성
좌측의 보안 부분에 들어가면 client secret을 생성할 수 있다. 보안을 위해서 코드를 생성해준다.

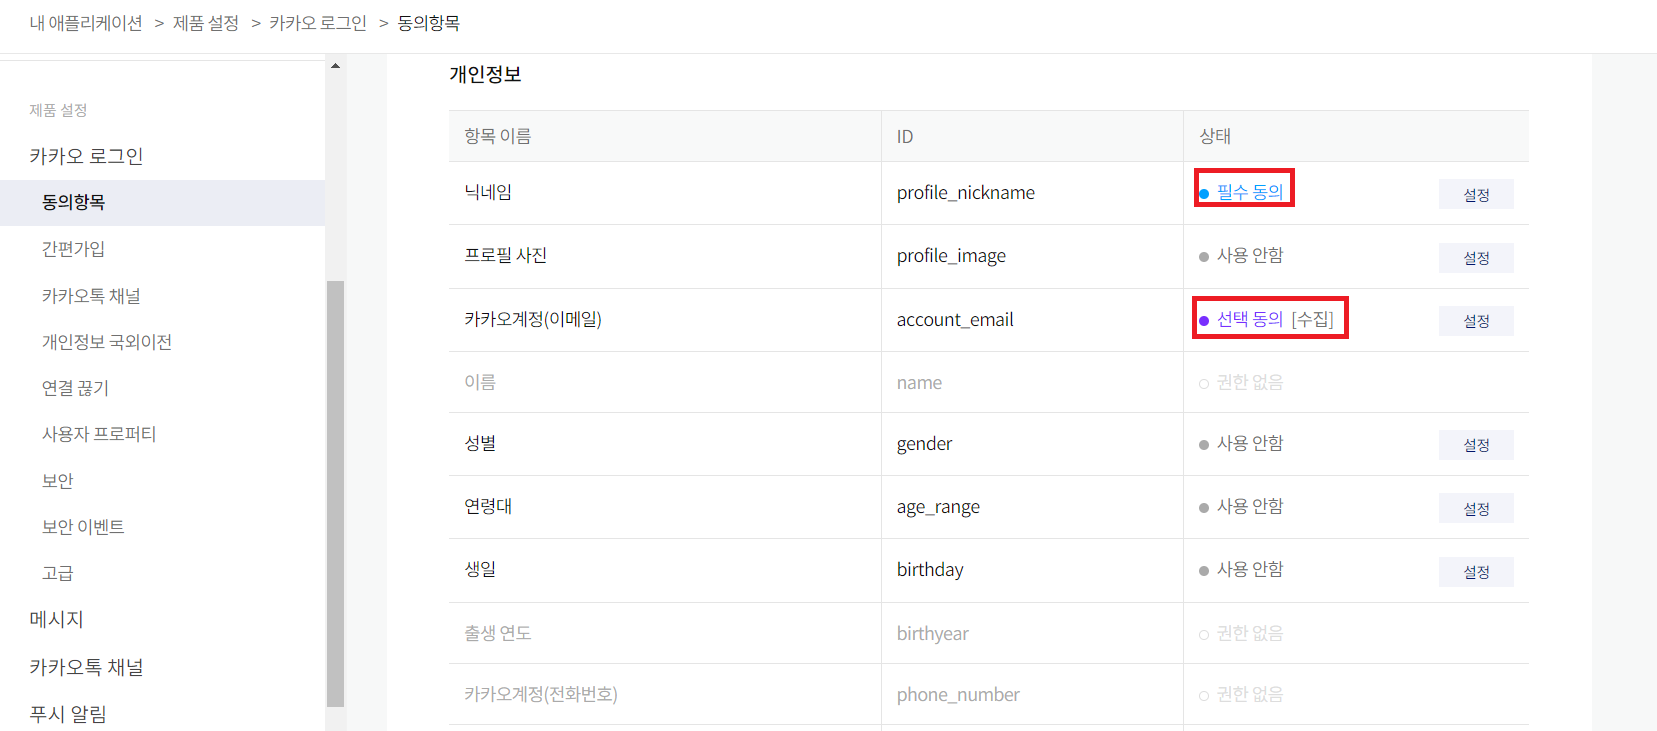
4. 동의 항목 설정
또한 수집할 개인 정보 설정을 해준다. 닉네임과 이메일만 받을 예정이므로 둘만 설정해준다.

이제 application.properties에 코드를 추가한다.
5. application.properties 설정
<application.properties>
#카카오 로그인
spring.security.oauth2.client.registration.kakao.client-id=[REST_API 키]
spring.security.oauth2.client.registration.kakao.client-secret=[SECRET_CODE]
spring.security.oauth2.client.registration.kakao.scope=profile_nickname, account_email
spring.security.oauth2.client.registration.kakao.client-name=kakao-login
spring.security.oauth2.client.registration.kakao.authorization-grant-type=authorization_code #고정 값
spring.security.oauth2.client.registration.kakao.redirect-uri=http://localhost:8080/login/oauth2/code/kakao #redirect-uri
spring.security.oauth2.client.registration.kakao.client-authentication-method=POST #http method
spring.security.oauth2.client.provider.kakao.authorization-uri=https://kauth.kakao.com/oauth/authorize
spring.security.oauth2.client.provider.kakao.token-uri=https://kauth.kakao.com/oauth/token
spring.security.oauth2.client.provider.kakao.user-info-uri=https://kapi.kakao.com/v2/user/me
spring.security.oauth2.client.provider.kakao.user-name-attribute=id
카카오 로그인 설정 부분만 가져왔다. 당연히 이전 포스팅에서 설정했던 데이터베이스 설정 또한 되어있어야 한다.
6. 코드 구현
OAuth2MemberInfo를 구현한 KakaoMemberInfo
public class KakaoMemberInfo implements OAuth2MemberInfo{
    private Map<String, Object> attributes;
    private Map<String, Object> kakaoAccountAttributes;
    private Map<String, Object> profileAttributes;

    public KakaoMemberInfo(Map<String, Object> attributes) {
        this.attributes = attributes;
        this.kakaoAccountAttributes = (Map<String, Object>) attributes.get("kakao_account");
        this.profileAttributes = (Map<String, Object>) attributes.get("profile");

    }


    @Override
    public String getProviderId() {
        return attributes.get("id").toString();
    }

    @Override
    public String getProvider() {
        return "kakao";
    }

    @Override
    public String getName() {
        return kakaoAccountAttributes.get("nickname").toString();
    }

    @Override
    public String getEmail() {
        return kakaoAccountAttributes.get("email").toString();
    }
}
구글, 페이스북, 네이버의 경우 필드 값으로 attributes만 있었는데 카카오의 경우 kakaoAccountAttributes, profileAttributes 또한 있는 것을 확인할 수 있다.
이는 카카오에서 유저 정보를 받아오는 형식이 다르기 때문이다.
카카오에서는 다음과 같이 유저 정보를 반환한다.
{
    id=2803163587,
    connected_at=2023-05-23T22:59:40Z,
    properties={nickname=별명},
    kakao_account={
    	profile_nickname_needs_agreement=false,
        profile={nickname=별명},
        has_email=true,
        email_needs_agreement=false,
        is_email_valid=true,
        is_email_verified=true,
        email=email@naver.com
    }
}
id, nickname, email이 모두 다른 위치에 존재하기 때문에 attributes를 3개를 지정하는 것이다.
OAuth2MemberService에도 카카오 부분을 추가해준다.
<OAuth2MemberService>
@Service
@RequiredArgsConstructor
public class OAuth2MemberService extends DefaultOAuth2UserService {
    private final BCryptPasswordEncoder encoder;
    private final MemberRepository memberRepository;

    @Override
    public OAuth2User loadUser(OAuth2UserRequest userRequest) throws OAuth2AuthenticationException {
        OAuth2User oAuth2User = super.loadUser(userRequest);
        OAuth2MemberInfo memberInfo = null;
        System.out.println(oAuth2User.getAttributes());
        System.out.println(userRequest.getClientRegistration().getRegistrationId());

        String registrationId = userRequest.getClientRegistration().getRegistrationId();
        System.out.println("registrationId = " + registrationId);
        if (registrationId.equals("google")) {
            memberInfo = new GoogleMemberInfo(oAuth2User.getAttributes());
        } else if (registrationId.equals("facebook")) {
            memberInfo = new FacebookMemberInfo(oAuth2User.getAttributes());
        } else if (registrationId.equals("naver")) {
            memberInfo = new NaverMemberInfo((Map)oAuth2User.getAttributes().get("response"));
        } else if (registrationId.equals("kakao")) {
            memberInfo = new KakaoMemberInfo(oAuth2User.getAttributes());
        } else {
            System.out.println("로그인 실패");
        }
        String provider = memberInfo.getProvider();
        String providerId = memberInfo.getProviderId();
        String username = provider + "_" + providerId; //중복이 발생하지 않도록 provider와 providerId를 조합
        String email = memberInfo.getEmail();
        String role = "ROLE_ADMIN"; //일반 유저
        System.out.println(oAuth2User.getAttributes());
        Optional<Member> findMember = memberRepository.findByName(username);
        Member member=null;
        if (findMember.isEmpty()) { //찾지 못했다면
            member = Member.builder()
                    .name(username)
                    .email(email)
                    .password(encoder.encode("password"))
                    .role(role)
                    .provider(provider)
                    .providerId(providerId).build();
            memberRepository.save(member);
        }
        else{
            member=findMember.get();
        }
        return new PrincipalDetails(member, oAuth2User.getAttributes());
    }
}
loginForm.html 파일에도 카카오 로그인 버튼을 추가한다.
<!DOCTYPE html>
<html lang="en">
<head>
    <meta charset="UTF-8">
    <title>Title</title>
</head>
<body>
<form action="/login" method="post">
    <input type="text" name="name">
    <input type="password" name="password">
    <button type="submit">제출</button>
</form>
<a href="/oauth2/authorization/google">google login</a>
<a href="/oauth2/authorization/facebook">facebook login</a>
<a href="/oauth2/authorization/naver">naver login</a>
<a href="/oauth2/authorization/kakao">kakao login</a>
<a href="/joinForm">회원가입 </a>
</body>
</html>
나머지는 구글, 페이스북, 로그인 할 때와 동일하다.
깃허브 주소
https://github.com/ezcolin2/Spring-Class/tree/main/oauth2
참고
https://developers.kakao.com/docs/latest/ko/kakaologin/rest-api#req-user-info
'공부 > Spring' 카테고리의 다른 글
| [Spring][인프런 스프링 DB] 트랜잭션(Transaction)과 락(Lock) (0) | 2023.06.07 |
|---|---|
| [Spring][인프런 스프링 DB] JDBC와 DataSource (0) | 2023.06.03 |
| [Spring] 스프링 OAuth2 카카오 로그인 과정 (OAuth2 스프링 5편) (0) | 2023.05.28 |
| [Spring] 이미지의 바이너리 데이터를 base64 인코딩 적용 후 저장하기 (1) | 2023.05.21 |
| [Spring][WebSocket] 채팅 입장, 퇴장 메시지 구현하기(Web Socket with STOMP) (2) (1) | 2023.05.19 |