본 포스팅은 김영한 강사님의 인프런 강의 "스프링 DB 1편"을 정리한 포스팅입니다.
https://www.inflearn.com/course/%EC%8A%A4%ED%94%84%EB%A7%81-db-1/dashboard
스프링 DB 1편 - 데이터 접근 핵심 원리 - 인프런 | 강의
백엔드 개발에 필요한 DB 데이터 접근 기술을 기초부터 이해하고, 완성할 수 있습니다. 스프링 DB 접근 기술의 원리와 구조를 이해하고, 더 깊이있는 백엔드 개발자로 성장할 수 있습니다., - 강의
www.inflearn.com
일반적인 데이터베이스 접근 방식은 다음과 같다.

클라이언트가 서버에 요청을 하면 서버가 위와 같이 데이터베이스에 접근하는 방식이다.
이러한 방식의 단점은 데이터베이스마다 방식이 다르다는 점이다.
이를 해결하기 위해 등장한 방식이 JDBC(Java Database Connectivity)이다.
JDBC가 표준 인터페이스(커넥션 연결, SQL 전달, 결과 응답)를 정해두면 데이터베이스 회사들이 이 인터페이스를 사용하여 라이브러리를 만든다.
이를 JDBC 드라이버라고 한다.
SQL mapper와 ORM
보통 JDBC를 직접 사용하기보다는 SQL mapper나 ORM과 같은 편리한 도구들을 사용한다.

SQL mapper는 응답 결과를 객체로 변환해주는 장점이 있지만 직접 SQL을 작성해야하는 단점이 있다.

ORM 기술은 객체를 관계형 데이터베이스 테이블과 매핑해주는 기술이다.
SQL을 작성하지 않아도 되기 때문에 생산성이 높아진다.
두 기술 모두 결국에는 JDBC를 이용한다.
JDBC
connection
H2 데이터베이스를 사용한다면 java.sql.Connection 인터페이스를 구현한 class org.h2.jdbc.JdbcConnection을 사용해서 Connection을 생성할 수 있다.
//connection 생성.
Connection connection = DriverManager.getConnection(URL, USERNAME, PASSWORD);
실제로 사용할 때는 try catch 구문으로 에러를 잡아야 한다. URL, USERNAME, PASSWORD는 abstract 클래스에 넣어둔 정보로 static import를 해서 사용하는 중이다. (생략)
@Slf4j
public class DBConnectionUtil {
    public static Connection getConnection() {
        try {
            Connection connection = DriverManager.getConnection(URL, USERNAME, PASSWORD);
            return connection;

        } catch (SQLException e) {
            throw new IllegalStateException(e);
        }
    }
}
driver manager connection 흐름

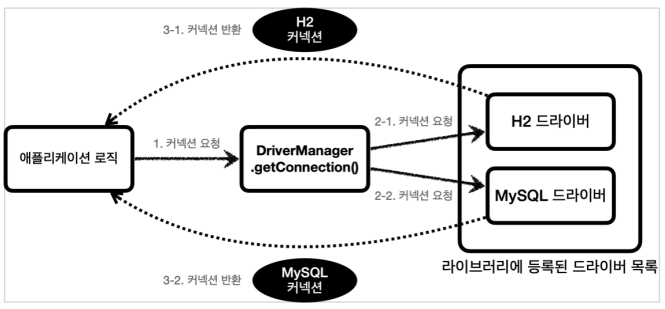
DriverManager가 라이브러리에 등록된 드라이버들에게 커넥션 요청을 보낸다.
드라이버는 url을 보고 처리 가능 여부를 반환한다. (h2는 jdbc:h2...)
이렇게 커넥션 구현체를 찾아서 반환한다.
참고로 생성한 리소스들은 전부 반환해줘야 한다.
반환 함수 예시
private void close(Connection con, Statement stmt, ResultSet rs) {
    if (rs != null) {
        try {
            rs.close();
        } catch (SQLException e) {
            log.info("error", e);
        }
    }
    if (stmt != null) {
        try {
            stmt.close();
        } catch (SQLException e) {
            log.info("error", e);
        }
    }
    if (con != null) {
        try {
            con.close();
        } catch (SQLException e) {
            log.info("error", e);
        }
    }
}
try-catch 구문을 통해 connection, statement, resultset들을 사용하고 나면 finally 구문 안에 위와 같이 닫아줘야 한다.
그렇지 않으면 리소스가 낭비된다.
Statement
PreparedStatement는 Statement의 구현체로 ?를 통한 파라미터 바인딩을 사용할 수 있다. (SQL injection에 대비하여 반드시 파라미터 바인딩 사용)
다음과 같이 사용한다.
//connection 연결
Connection connection = DBConnectionUtil.getConnection();

//query문 사용. 파라미터 바인딩 방식으로 사용할 것.
String url = "insert into Member(member_id, money) values (?,?)";
PreparedStatement stmt = connection.prepareStatement(url);

//파라미터 바인딩
stmt.setString(1, member.getMemberId());
stmt.setInt(2, member.getMoney());

//데이터베이스에 반영
stmt.executeUpdate();
Member 저장
public Member save(Member member) {
    //connection, Statement에 null 저장.
    Connection conn = null;
    PreparedStatement stmt = null;

    //query문 사용. 파라미터 바인딩 방식으로 사용할 것.
    String url = "insert into Member(member_id, money) values (?,?)";

    try {
        //Connection 생성
        conn = DBConnectionUtil.getConnection();

        //Statement 생성
        stmt = conn.prepareStatement(url);

        //파라미터 바인딩
        stmt.setString(1, member.getMemberId());
        stmt.setInt(2, member.getMoney());

        //데이터베이스에 반영
        stmt.executeUpdate();

    } catch (SQLException e) {
        e.printStackTrace();

    } finally {
        close(conn, stmt, null);
    }

    return member;
}
ResultSet
executeUpdate와 같이 데이터베이스를 변경하는 경우 반환 타입은 Int로 결과가 반영된 열의 개수를 반환한다.
그런데 executeQuery를 통해 데이터베이스를 조회하려고 한다면 쿼리에 대한 응답을 받아야할 것이다.
이럴 때 ResultSet을 반환해주는데 이 ResultSet을 사용해서 응답을 확인할 수 있다.

위 그림과 같이 ResultSet은 커서라고 보면 된다. 처음에는 컬럼들을 가리고 있고 next() 메소드를 사용하면 그 다음 행으로 이동할 수 있다.
만약 응답받은 행이 여러 개라면 반복문을 통해 전부 조회할 수 있을 것이다.
Member 조회
public Member findById(String memberId) throws SQLException{
    //connection, Statement, ResultSet에 null 저장.
    Connection conn = null;
    PreparedStatement stmt = null;
    ResultSet rs = null;

    //query 작성
    String url = "select * from Member where member_id = (?)";

    try {
        conn = DBConnectionUtil.getConnection();
        stmt = conn.prepareStatement(url);
        stmt.setString(1, memberId);

        //result set
        rs = stmt.executeQuery();

        //result 조회
        if (rs.next()) {
            Member member = new Member();
            member.setMemberId(rs.getString("member_id"));
            member.setMoney(rs.getInt("money"));
            return member;
        }
        else{
            throw new NoSuchElementException();
        }
    } catch (SQLException e) {
        e.printStackTrace();
        throw e;
    } finally{
        close(conn, stmt, rs);
    }

}
커넥션 풀
위에서 DriverManager를 사용하여 커넥션을 획득하였는데 커넥션을 생성하는 시간은 일반적으로 복잡하고 오래 걸린다.
그런데 데이터베이스에 쿼리를 날릴 때마다 커넥션을 획득하면 많은 시간이 걸리게 된다.
그래서 나온 개념이 커넥션 풀이다.
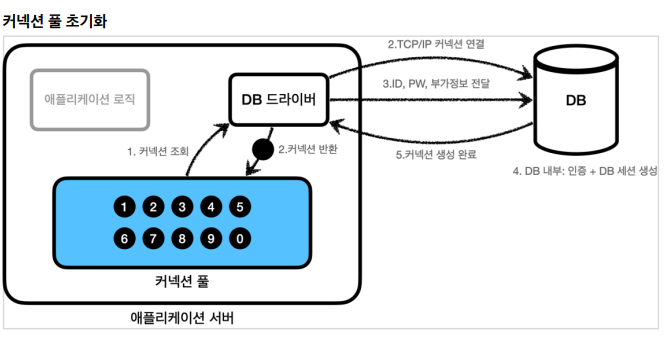
커넥션 풀에 미리 커넥션을 여러 개 만들어두고 이 커넥션을 가져와서 쓰는 개념이다.
다 사용하고 나면 다시 커넥션을 커넥션 풀에 반납한다.


커넥션 풀은 여러 종류가 있는데 스프링에서는 기본 커넥션 풀로 HikariCP를 사용한다.
Datasource
커넥션을 얻는 방법은 여러가지이다. DriverManager를 통해 직접 획득하던가 커넥션 풀을 통해 획득할 수도 있다.
커넥션 획득 방식을 추상화 한 것이 바로 Datasource이다.

datasource를 사용하기 위한 메소드를 만든다.
private void useDataSource(DataSource dataSource) throws SQLException {
    Connection connection1 = dataSource.getConnection();
    Connection connection2 = dataSource.getConnection();
    System.out.println("connection1 = " + connection1);
    System.out.println("connection2 = " + connection2);

}
이제 이 메소드를 사용하여 DriverManagerDataSource와 HikariPoolDataSource의 사용법은 알아볼 예정이다.
DriverManagerDataSource
@Test
@DisplayName("DriverManagerDataSource test")
public void driverManagerDataSource() throws SQLException {
    //DataSource 설정
    DriverManagerDataSource driverManagerDataSource = new DriverManagerDataSource(URL, USERNAME, PASSWORD);

    //DataSource 사용
    useDataSource(driverManagerDataSource);
}
HikariPoolDataSource
참고로 커넥션 풀에 커넥션을 채우는 과정은 오래 걸리기 때문에 별도의 쓰레드를 생성해서 커넥션을 채운다.
쓰레드를 사용하지 않으면 커넥션을 채우는 과정 때문에 애플리케이션 실행 시간이 늦어진다.
HikariPoolDataSource
@Test
@DisplayName("HikariPoolDataSource test")
public void hikariPoolDataSource() throws SQLException, InterruptedException {
    //DataSource 설정
    HikariDataSource hikariDataSource = new HikariDataSource();
    hikariDataSource.setJdbcUrl(URL);
    hikariDataSource.setUsername(USERNAME);
    hikariDataSource.setPassword(PASSWORD);
    hikariDataSource.setMaximumPoolSize(10);
    hikariDataSource.setPoolName("MyPool");

    //DataSource 사용
    useDataSource(hikariDataSource);
    Thread.sleep(3000);
}
'공부 > Spring' 카테고리의 다른 글
| [Spring][인프런 스프링 DB] 트랜잭션(Transaction) 문제 해결 (0) | 2023.06.25 |
|---|---|
| [Spring][인프런 스프링 DB] 트랜잭션(Transaction)과 락(Lock) (0) | 2023.06.07 |
| [Spring] 스프링 OAuth2 카카오 로그인 (OAuth2 스프링 6편) (0) | 2023.06.01 |
| [Spring] 스프링 OAuth2 카카오 로그인 과정 (OAuth2 스프링 5편) (0) | 2023.05.28 |
| [Spring] 이미지의 바이너리 데이터를 base64 인코딩 적용 후 저장하기 (1) | 2023.05.21 |